A pull-up bar is one of the smallest additions that makes the most significant difference in a home gym. Chin-ups, dead hangs, leg raises - it all starts with a bar overhead. Figuring out how to install pull up bar takes far less time than the workout itself. This guide covers doorway setups and bolted wall mounts so you can pick the right method. Browse the full range of pull-up bars and keep reading!
What this guide covers:
- Doorway vs wall-mounted - which type suits your training and living situation
- Frame and wall checks - how to tell if your surface can handle the load
- Step-by-step setup - instructions for both screw-free and bolted options
- Common mistakes - errors that loosen bars or damage walls
What Type of Pull-Up Bar Is Right for Your Home?
Doorway bars use tension to grip the inside of a frame - no screws, no holes, and you can remove them in seconds. They suit renters and tight rooms. The trade-off is a lower weight limit and fewer grip positions compared to bolted options.
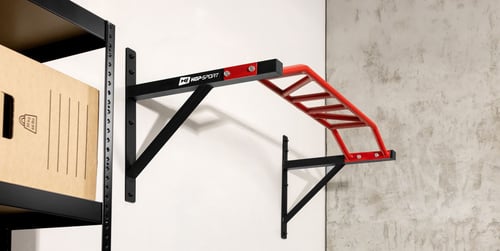
Wall-mounted bars bolt into masonry or studs and stay put. They handle heavier loads, offer wider grip angles, and feel more stable during weighted pull-ups. Designs range from a standard fixed bar to a grid-style pull-up bar with multiple hand positions built into a single frame.
Deciding where to put a pull up bar on the wall comes down to stud locations and ceiling height, but if you train regularly, a fixed mount is the stronger long-term choice.

How to Install a Doorway Pull-Up Bar (No Screws)
Check Your Door Frame First
Not every frame is up to the job. Run your knuckles along the inside edge - solid wood or metal gives a firm, dull sound, while hollow moulding flexes and sounds tinny. Measure the internal width where the bar will sit and compare it to the adjustment range. Check ceiling clearance too, so your knuckles do not scrape mid-rep.
Step-by-Step Setup
- Extend the bar to match your frame width and slot it in at chest height to check fit.
- Raise it to your mounting height - high enough that you hang with arms extended and feet just off the floor.
- Twist the mechanism until rubber caps press firmly into both sides. The bar should not rotate.
- Hang gradually - partial weight first, then fully commit with a few side-to-side swings.
- Re-tighten after the first hang. Rubber compresses under load, so a second twist locks it.

A doorway pull-up bar with non-slip padding and a telescopic design makes this quick. Every model ships with a step-by-step guide covering the exact tension range for your frame width - follow it rather than guessing by feel. Re-check tension every couple of weeks if the frame is wood - it shifts with humidity.
How to Install a Wall-Mounted Pull-Up Bar
Tools You Will Need
Every bar in the range ships with its own step-by-step guide, the correct wall plugs, and matching coach bolts. Gather the rest of your toolkit before you start - pausing midway for a missing drill bit turns a quick job into an afternoon.
Your basic toolkit:
- Hammer drill - standard drills struggle with brick or concrete
- Spirit level - crooked mounts stress one side unevenly
- Pencil and tape - mark every hole before you drill
A stud finder helps on timber-framed walls. For brick or concrete, the included wall plugs and coach bolts do the job.
Mounting Step by Step
Hold the bracket against the wall, level it, and mark the holes. Drill to the depth in the guide, tap wall plugs flush, then drive each bolt through evenly - do not torque one side before the other. Our wall-mounted pull-up bar fits on both walls and ceilings, with multiple grip angles for wide, narrow, and neutral positions from a single mount.
How Do You Know Your Pull-Up Bar Is Safely Installed?
A bar that is properly mounted feels rock-solid the moment you grab it - no creaking, no flex, no play in any direction. Hang for thirty seconds, then try a few slow pull-ups. Listen at the mounting points. Silence is good. Any clicking or crumbling plaster means something needs fixing.
Check the rated capacity on the product page before adding a weight vest or plates - every model lists its maximum load clearly. For weighted training, a reinforced pull-up barrated for up to 200 kg handles the extra demand. We build it with multi-layer non-slip padding and reinforced tubing, so it locks in and holds firm from the first rep.

What Are the Most Common Pull-Up Bar Installation Mistakes?
Most problems with installing pull up bar come down to rushing. The setup looks deceptively simple, corners get cut, and small oversights stack up.
Mistakes that cause the most trouble:
- Wrong wall type - plasterboard alone will not hold; you need studs or masonry behind it
- Skipping the level - an unlevel bar loosens fixings and strains your shoulders unevenly
- Over-tightening - cranking doorway bars too hard cracks wooden frames
- Mounting too low - bent knees during dead hangs cut your exercise options in half
Every one of these issues traces back to the same shortcut: skipping the guide. Slow down, follow each step, and test before you train. Five minutes of prep beats replastering a wall.
Choosing the Right Setup for Your Training Goals
A doorway bar gets you started fast with pull-ups, chin-ups, and hanging stretches. For weighted reps or ring attachments, a wall mount gives the stability those movements need. Either way, the pull up bar installation is one of the simplest upgrades you can make. Browse our full pull-up bar range - every bar ships with hardware and a step-by-step guide!
Explore more topics:
Author: Hop-Sport Team